
1: Colour the areas to be red in a base layer of CR8. It is best to work one area at a time, (eg: the hood then the back and sleeves of the coat followed by the front area of the coat) this prevents the ink drying out too fast which can make blending harder.
Use DR7 to shade the areas to be darkest (around the edge of the hood, under the arms, in the coat pleats etc) use a circular motion to prevent having a hard line to blend out.

2: Using CR11 shade in further using a circle motion to also blend out the line from the DR7. Do not cover all of the CR8.

3: Using the CR8 again, and colouring in a circular motion, blend out the line created by the CR11. You will now have a smooth red coat, there would be nothing wrong with stopping here but the difference the greys will make is huge.
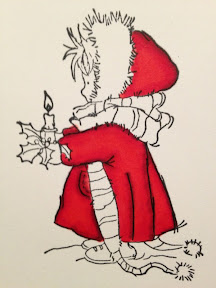
4: First using BG6 go over the areas where you did the darkest shading with the DR7 Marker.

5: Using BG4 blend the darker line in the same way you did with the CR11

6: Use BG2 to blend the line left by the BG4 but do not blend into the red as it will start to bleach it.

7: Lastly use the CR8 marker again to blend in the BG2

8: Colour remaining parts of the image. Note: if using pale colours such as the EB1 used for the fur on the hood it is best to do those colours first before starting the red as the red will leave marks if it gets on the tips of the paler colours. The colours used for the remaining areas are:
Hair: GB8, GB9, CT2
Skin: FS3, FS6, TN2, FS8 (Cheeks)
Shoes and Gloves: TN3, TN5, TN7
Scarf: BT4, BT5, BT7, LV3, PL4, PL5
Candle, Fur on Hood and end of Scarf: EB1
Holly: JG1, JG2, JG6, DR7 (Berries)
Flame: OR1, CT3
Snow: IG1, Blender Pen

It's not until you put the red image and the one with the grey next to each other that you can really see the difference:-)

awsome! Thanks for the lesson, Im going to give this a try :)
ReplyDelete